


-
Desk of Contents
“Remodel Your Tracks: Crafting Lifelike Landscapes for model Trains”
Introduction
Building a detailed model of a setting requires imagination, accuracy, and a keen eye for detail. The process involves making little landscapes that bring model railroads to life, transforming them into enchanting settings that tell a story. Learning the fundamentals of building realistic environments can take your format to the next level, regardless of your level of experience with model trains. When you want your illustration to look realistic, every detail matters. This includes picking out the right materials and learning how to make realistic terrain, as well as adding complex details like buildings, flora, and weathering effects. By reading this, you will learn essential techniques and insights that will allow you to build an impressive and engaging model train preparation environment that showcases your imagination and improves your model railroad’s overall expertise.
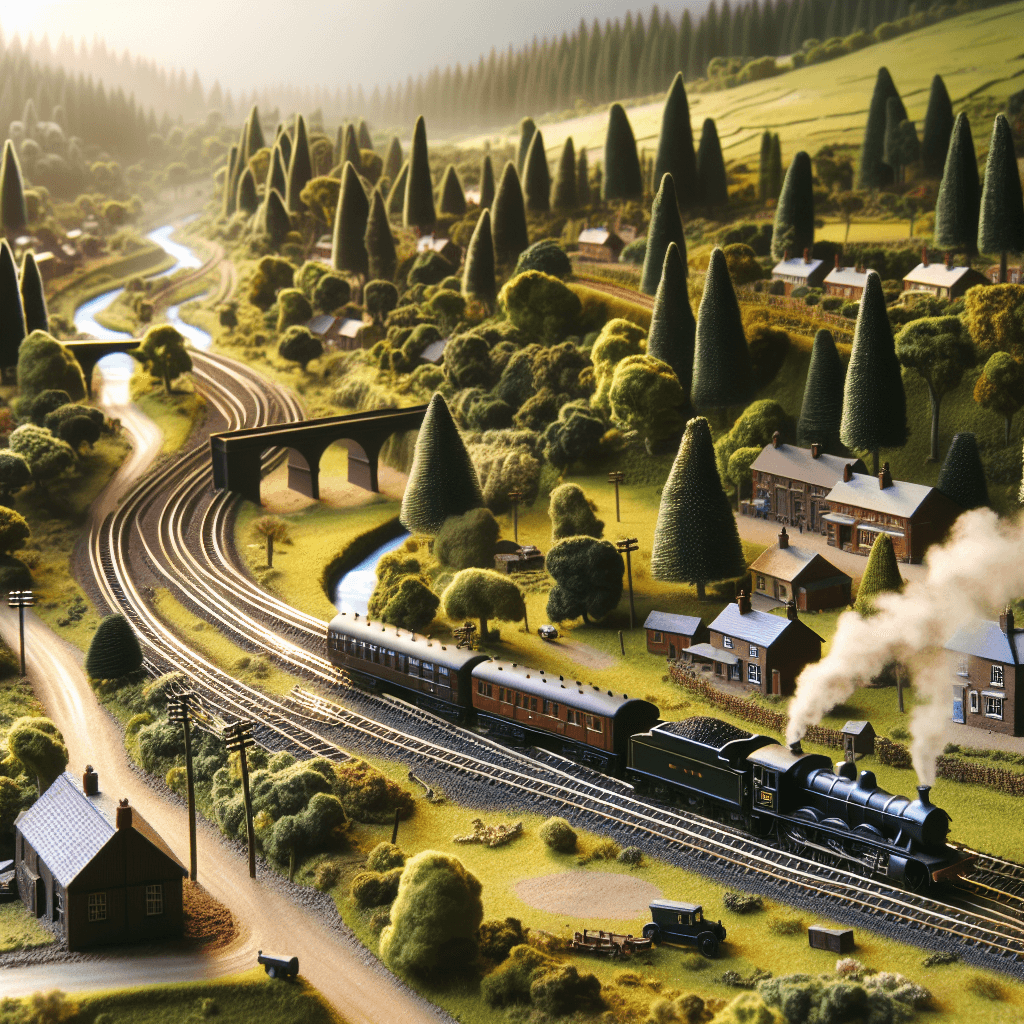
Mastering Terrain Strategies: Crafting Practical Landscapes for model Prepare Surroundings
A keen eye for detail and an in-depth knowledge of terrain methods are necessary for creating detailed model create environments that look lifelike. When one does model railroading, it’s not only about the trains; it’s also about the scenery they pass through. A variety of landscape procedures that bring the miniature world to life can be learnt in order to achieve a realistic scene.
First and first, preparation is key. Make sure you have a clear vision of the landscape you want to build before you start gathering materials and breaking ground. Think about the landscape elements like mountains, valleys, rivers, and cities that you would like to represent. To better envision the finished result and ensure that all parts are balanced and complementary, sketching a rough format can be helpful. This first stage provides the groundwork for a consistent and realistic model preparation environment.
After the planning phase is complete, the next crucial step is to select the best materials. How realistic the landscape appears depends heavily on the materials you use. Using high-quality plaster or foam, for instance, can provide a solid foundation for hills and mountains. These materials are quite pliable, so they may be easily shaped to seem like natural landscapes. Also, when the environment changes, it will be easier to make simple alterations by using lightweight materials like cork or foam board for the base.
Moving on from materials to techniques, layering is an effective way to make realistic landscapes. The process of layering is building up a variety of hues and textures to provide the illusion of depth and perspective. Floor covering supplies, such as amazing turf or static grass, should be applied after a foundation layer of earth-toned paint that mimics soil. You can make the floor look like dirt, gravel, or grass by simply scattering or glueing these materials across it. By experimenting with different colours and textures, you may achieve a more realistic look that reflects the diversity found in real landscapes.
Element consideration is of utmost importance, along with stacking. The realism of the model training environment can be greatly enhanced by the addition of small details like rocks, shrubs, and water possibilities. You can use real stones or make your own moulds out of plaster to create rocks. For a more realistic portrayal, try using a combination of greys and browns. For added convenience, you can purchase pre-made bushes or construct your own using wire armatures covered with leaf materials. It is possible to generate water effects, such as rivers or lakes, by using transparent resin or specific water products that mimic the appearance of moving water.
Lighting also plays a significant role in making the environment more vibrant. With the right illumination, you can draw attention to certain details while also adding realism through shadows. You might use LED lights to make it look like it’s day or night, depending on the mood you want to create. The idea of the panorama can be drastically changed by experimenting with various lighting angles and intensities, making it seem more dynamic and interesting.
Finally, learning terrain approaches requires endurance and application. It takes a lot of time and effort to create a realistic model preparation environment. Take your time and carefully adjust each component as needed; there’s no need to hurry the process. Crafting a panoramic panorama that not only enhances your model trains but also captivates the creativity of everyone who watch it requires persistence and attention to detail.
Important Instruments And Supplies For Constructing Detailed model Prepare Surroundings
An enjoyable activity that combines artistic expression, technical skill, and a touch of nostalgia is the creation of intricate model prepare environments. Having the right tools and materials is essential for creating a realistic and beautiful panorama. This not only improves the overall skill of building a miniature environment, but it also guarantees accuracy and quality. Being familiar with the necessary tools and materials becomes critical when one sets out on this creative path.
First things first, you will need a solid workbench. This provides a stable base upon which to build and assemble the many parts of the model preparation environment. An essential accessory for any workbench is a reducing mat. It prevents damage to the floor and provides a grid for precise measurements, both of which are necessary for accurate supply reduction. As you move from the work surface to the tools, a sharp utility knife is an essential tool. Intricate cuts and detailing are made possible, which is crucial for making realistic options like houses, shrubs, and other landscape components.
For adding texture and shade to the environment, a set of fine-tipped paintbrushes is essential, along with reduction tools. It is essential to apply paint in small, controlled strokes while working on detailed regions, and these brushes make that possible. Because of their adaptability and speed of drying, certain acrylic paints are extremely useful in conjunction with the paintbrushes. Acrylic paints are ideal for use in a model preparation setting because of their excellent adhesion to a variety of surfaces.
When putting together various parts, a reliable glue is also required. While white glue works well for most materials, cyanoacrylate (terrible glue) is ideal for anchoring things that are very heavy or fragile. A pair of tweezers is also necessary for assembling the environment. If you’re having trouble using your fingers to manipulate little objects, such figurines or minute panorama details, these will come in handy.
Now let’s talk about the materials. Plaster cloth and foam board are the mainstays of terrain development. Plaster cloth adds power and texture, while foam board provides a lightweight and easily mouldable foundation. When put together, they form the backbone of the panorama and provide a background for more details. Provide floor cowl supplies that are similar to static grass, ballast, and vegetation to enhance the authenticity of the terrain. These materials bring the environment to life by simulating its natural components.
Incorporating lighting components can also greatly enhance the visual magic of the model preparation environment. The low heat emission and high power efficiency of LED lights make them very efficient. They add a dynamic element to the performance and can be used to illuminate buildings, streetlights, and even the setup itself.
In the end, having a comprehensive set of reference materials, such as images or books on the subject of model preparation environments, can serve as a source of inspiration and guidance throughout the process. These resources help one hone their skills and get a better final product by providing helpful insights into methodologies and design concepts.
Finally, a variety of crucial tools and materials, each playing an essential role in the construction of a small world, are required to make a detailed model prepare environment. Fans may make a realistic and beautiful panorama for their model trains by purchasing high-quality equipment and learning how it works. With persistence and careful attention to detail, building a model preparation environment can be a rewarding and enjoyable experience.
Incorporating Water Options: Creating Rivers, Lakes, And Waterfalls In model Prepare Layouts
Adding water features to model preparation plans can greatly enhance the environment’s authenticity and aesthetic allure. It takes careful preparation and execution to create rivers, lakes, and waterfalls, but the results may be stunning. Think about the big picture and how big your model will be before you even begin to develop the format. It will guide you on the size and placement of your water features to make sure they don’t compete with the surrounding landscape but rather enhance it.
Selecting the appropriate materials is the next stage after obtaining a clear vision. Many modellers use products like transparent resin or specific water results gels to create lakes and rivers, which may be shaped and poured to mimic the natural flow and surface of water. These materials are quite effective since they can be dyed to get any desired hue, be it the clear green of a pond or the murky blue of a mountain lake. More realistic elements, such as boulders, sand, and bordering flora, might be added to make the image more convincing.
The process may be slightly more complex when it comes to making waterfalls. Making the waterfall out of transparent silicone or acrylic sheets is a popular option. You can create the illusion of a waterfall’s movement and texture by cutting the cloth into narrow strips and stacking them. Consider utilising a miniature pump to simulate flowing water for an extra realistic touch; however, be careful with the waterproofing and maintenance to avoid damaging your format.
You should think about the terrain of your model’s preparation format as you move from lakes and rivers to waterfalls. You can incorporate hills or other raised terrain into your waterfalls to mimic the natural flow of water from higher to lower levels. This serves to blend the water options into the overall design while also adding visual interest.
Lighting plays an essential role in bringing water alternatives to life, just as physical growth does. By carefully placing LED lights, one may achieve stunning reflections and highlights, just like the way natural sunlight reflects off of water. If you want your rivers, lakes, and waterfalls to stand out more, try experimenting with different angles and intensities.
Sound also adds another level of realism to your model training environment, which is sometimes disregarded. To further immerse viewers in the environment you’ve built, a small audio system can be hidden inside the format to provide sounds like a brook’s gentle murmur or a waterfall’s thunderous roar. The use of both sight and sound enhances the immersion of the experience thanks to this multimodal approach.
Last but not least, make sure to regularly refill your water options. Floors can gradually lose their lustre as dirt and debris settle on them. They can look brand new for as long as you clean them regularly and touch them up occasionally with new resin or water results gel. Additionally, to avoid leaks or stagnation, ensure that the pumps and tubing are in good working order after adding actual water.
The incorporation of water possibilities into model preparation layouts, in conclusion, calls for an amalgam of imagination, technical know-how, and attention to detail. To make your model train environment more realistic and beautiful, you can add rivers, lakes, and waterfalls by carefully arranging the location, selecting appropriate materials, and thinking about components like lighting and sound. With little time and effort, you can transform your format into a lovely little world using these features.
Q&A
1. **Query:** How can I create lifelike terrain for my model prepare surroundings?
**Reply:** Use a mix of froth board and plaster fabric to form the terrain. Carve the froth to create hills and valleys, then cowl it with plaster fabric for a practical texture. Paint and add floor cowl supplies like grass, filth, and rocks for added realism.
2. **Query:** What supplies can I take advantage of to make bushes for my model prepare format?
**Reply:** Use twisted wire armatures lined with foliage supplies comparable to floor foam or polyfiber. Alternatively, you should use pre-made tree kits or pure supplies like twigs and lichen to create lifelike bushes.
3. **Query:** How do I incorporate water options into my model prepare surroundings?
**Reply:** Create water options utilizing supplies like clear resin or water results merchandise. Sculpt the waterbed with plaster or foam, paint it in shades of blue and inexperienced, and pour the resin to simulate water. Add particulars like rocks, vegetation, and small animals to boost realism.
Conclusion
Careful preparation, imagination, and attention to detail are required to build an extensive model preparation environment. Start by looking into various model preparation setups and real-world landscapes for ideas. Create a layout that incorporates scenic elements, terrain choices, and observe placement. Assemble the base using high-quality materials and tools to guarantee stability and durability. Use a variety of materials, such as foam, plaster, and paint, to create realistic textures and hues. Recognise the importance of proportion and scale to maintain reality. Lighting may enhance the mood, and adding details like buildings, shrubs, and people can make the image come to life. Repeatedly stepping back allows you to assess the overall composition and make any necessary adjustments. Finally, take your time and enjoy the process; building a thorough model preparation environment is an art form and a skill that develops with practice.

