


- Table of contents:
- Quick start: what “realistic” means
- Tools you actually need (and what to skip)
- Best no-airbrush techniques compared
- Step-by-step: 30-minute freight car weathering workflow
- Technique 1: acrylic wash for road film
- Technique 2: dry brushing for edges and details
- Technique 3: weathering powders and chalk pastels
- Rust that looks real: rust streaks without drama
- Scale tips for HO scale freight cars vs N scale freight cars
- Lock it in: sealing model trains (without ruining the effect)
- Common mistake + troubleshooting checklist
Key Takeaways :
- Start with prototype photos so your dirt pattern makes sense.
- Use a thin acrylic wash for the “overall film,” then add targeted dirt.
- Save heavy rust for cars that truly earn it—subtle rust streaks look more convincing.
- weathering powders/chalk pastels are fast and forgiving, but they need “tooth” to stick.
- A light matte varnish can protect work, but too much will mute everything.
Quick start: what “realistic” means
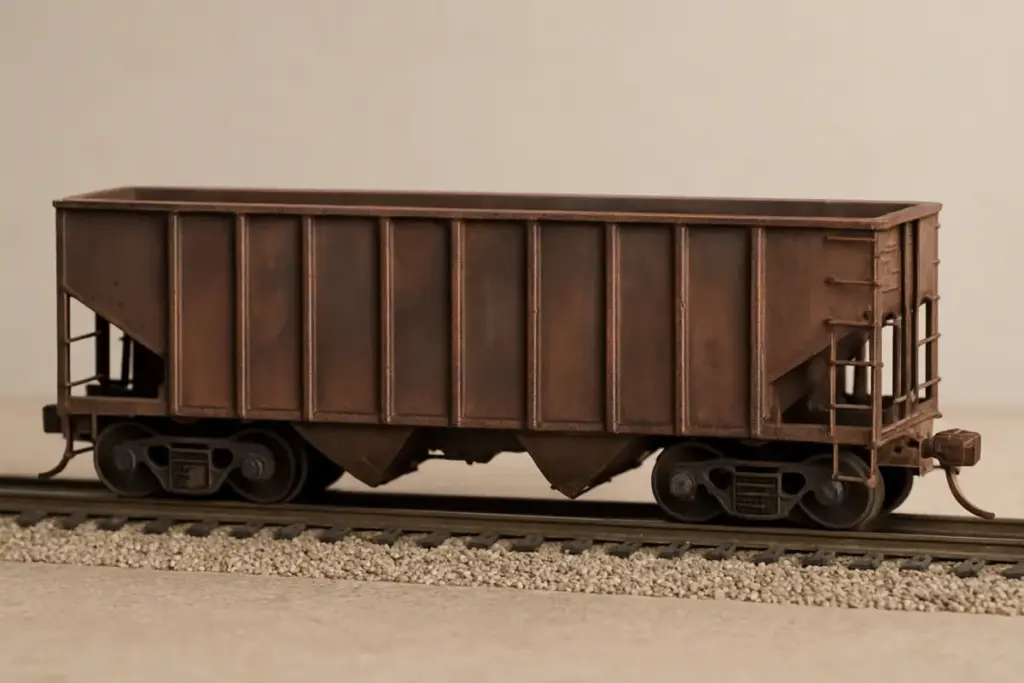
When people ask about realistic weathering, they usually mean this: the car stops looking like shiny plastic and starts looking like it’s been outside, handled, and dragged through a working railroad world. The trick is pattern, not darkness.
A simple way to get that pattern right is to decide whether you’re doing freight car weathering that’s “generic” (looks plausibly used) or matched to a specific car using prototype photos (every streak and stain placed on purpose) [1]. If you’re newer, generic gets you 90% of the payoff with far less stress.
Tools you actually need (and what to skip)
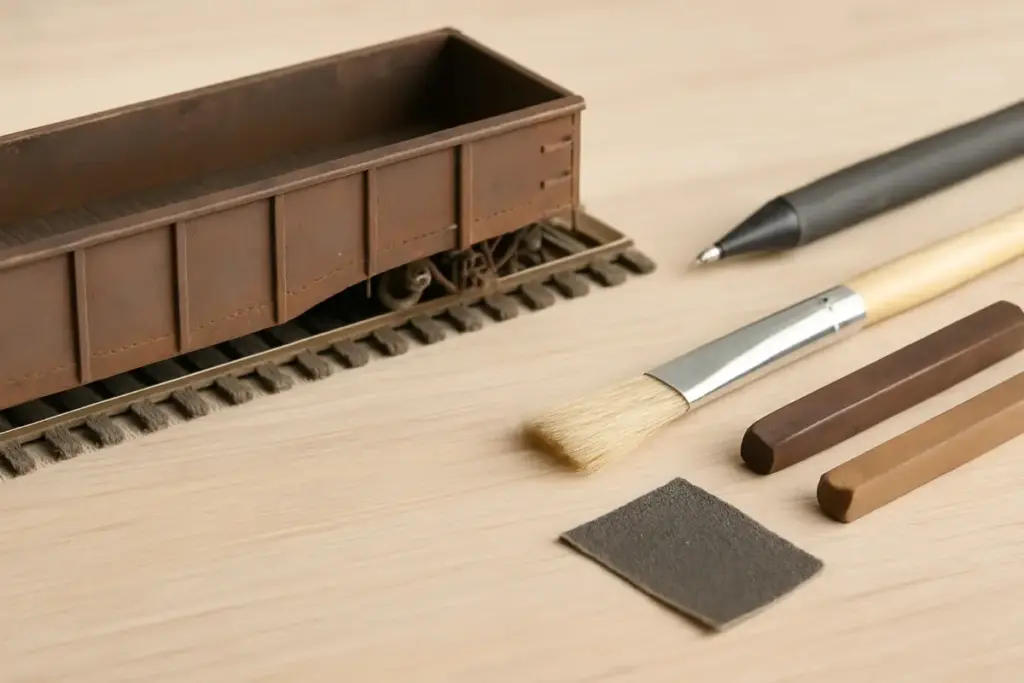
You can do excellent weathering model trains work without an airbrush—especially on rolling stock [1]. Here’s the “starter kit” I’d hand someone at the club workbench:
Essentials
- Soft flat brush (makeup brush works great for powders)
- 1–2 smaller brushes (detail + “streak” brush)
- Cheap mixing palette (bottle cap is fine)
- Paper towels + cotton swabs
- A clear flat/fixative option for later (matte varnish / flat fixative) [1]
Nice-to-haves
- Nitrile gloves (keeps fingerprints off your finish)
- A foam makeup applicator (surprisingly useful for blending) [1]
- Small weathering sponge (for chips and scuffs)
What to skip for now
- Ten “special” products that all do the same thing
- Heavy rust colors before you’ve learned light dirt
Shop-tip moment: I’ve seen more great freight cars weathered with dollar-store makeup brushes than with fancy tools. Soft bristles + gentle pressure = believable dust.
Best no-airbrush techniques compared
| Technique | Best for | Speed | Control | Durability (unsealed) | Notes |
|---|---|---|---|---|---|
| acrylic wash | Overall “used” film + panel tone | Fast | Medium | Good | Great first step; avoid puddles/tide marks [1][4] |
| dry brushing | Raised details, edges, grabs | Fast | High | Great | Easy to overdo—use almost-dry paint |
| weathering powders | Dust, soot, soft dirt | Very fast | Medium | Low | Needs surface “tooth” or it rubs off [1][3] |
| chalk pastels | Rust/dirt tones, gentle fading | Very fast | Medium | Low | Scrape to powder; super forgiving [2][3] |
| Pencil/pastel pencil | Grime lines, ribs, seams | Fast | High | Medium | Excellent for beginners [1] |
Step-by-step: 30-minute freight car weathering workflow
This is my go-to “one car” process that scales into batch work.
1) Pick a dirt story (2 minutes)
Look at prototype photos of similar cars (era + service matters). Where does dirt collect? Roof seams, ladders, lower side panels, around door tracks, and under the ends [1].
2) Kill the shine (optional but helpful) (5 minutes + dry time)
A flat surface helps powders grab and helps the whole car read “scale.” Many modelers use a flat fixative to add tooth and reduce the plastic shine before powder work [1]. (We’ll talk more about sealing model trains later.)
3) Lay down light “road film” (8 minutes)
Use an acrylic wash to tint the car so it stops looking factory-fresh. Keep it subtle. You can always add more.
4) Add targeted dirt (8 minutes)
Use weathering powders or chalk pastels for dust on the lower third of the car, plus roof soot. Think “traffic film,” not “abandoned hulk.” Powder is your friend for speed [1][3].
5) Pop the details (5 minutes)
A little dry brushing on grabs, ribs, and edges makes details read from normal viewing distance.
6) Finish with a few streaks (2 minutes)
Add a couple of rust streaks under bolts, seams, or roof edges—then stop. Two good streaks beat twenty cartoon ones.
Technique 1: acrylic wash for road film
An acrylic wash is just paint thinned enough that it behaves like dirty water. The goal is a transparent tint, not a coat.
Simple mix (easy to remember):
- Start very thin. If it looks like “weak tea,” you’re close.
- Test on the underside first.
How to apply:
- Load the brush, then wipe most off so you don’t flood the car.
- Pull the wash downward, the way rain would run. That “gravity logic” is a big realism multiplier [1].
- Keep the surface wet while you work a panel so it dries evenly (avoids splotches) [2].
If you get tide marks: don’t panic. Re-wet the area with a clean damp brush and feather the edge. Washes are meant to be adjustable, and they’re often used to blend and soften transitions (think “filtering”) [4].
Technique 2: dry brushing for edges and details
dry brushing is the fastest way to make molded detail look like metal and paint instead of plastic.
The rule: the brush should feel “almost empty.”
- Dip the tip in paint.
- Wipe it on a paper towel until it barely leaves a trace.
- Lightly skim raised details: ladders, ribs, grab irons, door tracks.
Where it shines on freight cars:
- Ribbed boxcars and hoppers (ribs catch light)
- End ladders and brake gear
- Roofwalk edges
Common mistake: using a bright silver or white and hitting everything. Real cars don’t wear evenly. Pick a muted tone that matches your car’s base color—just a shade lighter.
Technique 3: weathering powders and chalk pastels
If your goal is “good-looking cars fast,” weathering powders and chalk pastels are the workhorses. Powdered pastel weathering has been a staple for freight cars for ages, and you can buy ready-made powders or scrape pastel sticks into your own [3].
Getting powders to stick
Non-porous plastic can make powder slide around or rub off. A flat fixative can add surface tooth and help powders adhere better [1]. A flat finish is also commonly used as the “grab layer” before applying powdered pastels [3].
Where to apply (for believable grime)
- Lower third of the sides (road dust + brake dust)
- Trucks and underbody
- Roof seams and panels (soot + weather film)
Fast method I use:
- Load a soft brush with powder.
- Tap off extra (seriously—less than you think).
- Build it in layers. You can always add more; removing is harder.
Little realism trick: After applying, brush upward very lightly from the bottom edge. Real dirt transitions; it doesn’t stop in a straight line.
(Internal link: /powders-and-pastels)
Rust that looks real: rust streaks without drama
Rust is where beginners get loud. Most freight cars are dirty long before they’re rusty.
Use rust streaks sparingly:
- Under roof seams
- Below bolt lines
- Around damage spots or scrapes
How to make streaks look natural:
- Place a tiny dot of rust tone near the top source point.
- Pull downward with a slightly damp brush to fade it.
- Vary length and intensity—repeat patterns are the giveaway.
If you want to go deeper than “generic rust,” match the pattern to prototype photos. That’s the difference between “nice weathering” and “how did you DO that?” [1].
Scale tips for HO scale freight cars vs N scale freight cars
Scale changes how heavy weathering reads.
For HO scale freight cars
- You can show a bit more texture: subtle chips, layered dust, richer streaks.
- dry brushing works well because details are big enough to catch it.
For N scale freight cars
- Keep everything lighter and simpler. One clean note: the same wash/pastel approach is often used specifically on N scale freight cars to quickly age cars without heavy buildup [2].
- Big, dark effects look “chunky” fast. Think suggestion, not texture.
Rule of thumb: In smaller scales, reduce contrast. You want the car to read weathered from 2–3 feet away, not just in a macro photo.
Lock it in: sealing model trains (without ruining the effect)
Here’s the honest truth: you seal when you need to, not because someone online said “always.”
Powders and pastels can rub off during handling, especially on plastic. Many modelers use a flat fixative (often a Dullcote-style product) either before powders to add tooth, and sometimes after to lock them in—but an over-spray can noticeably tone down the effect [1]. That last part matters.
Best practice for sealing model trains
- Use a light mist coat first.
- Let it dry fully.
- Re-assess before adding more.
If you want the keyword version: a light matte varnish can protect the finish, but too much will mute contrasts and make your dust disappear [1][3]. When in doubt, seal lightly, then touch up.
Common mistake + troubleshooting checklist
The #1 common mistake
Making every car equally filthy. Real trains are a mix: some fresh, some average, a few truly rough. If every car has heavy rust, your whole fleet stops looking believable.
Troubleshooting checklist (save this)
- My wash dried blotchy.
Re-wet and feather with a clean damp brush; work smaller areas and keep edges wet while you blend [2][4]. - Powder won’t stick.
Add tooth first with a flat fixative / matte varnish layer, then re-apply powder gently [1][3]. - My car looks “painted,” not dirty.
You probably used one strong color. Add a lighter dust layer and break up big areas with subtle variation. - Rust looks like stripes.
Fewer rust streaks, more fade. Blend downward and vary lengths. - Everything got too dark.
Dry brush highlights back in, or add a very light dust layer to soften contrast.
- FAQ:
Q1: What’s the fastest way to start realistic _weathering model trains_?
Start with a light overall film (an acrylic wash) and a soft dust layer using weathering powders or chalk pastels [1][3][4].
Q2: Do I need an airbrush for _freight car weathering_?
No. Plenty of great freight car weathering can be done with pencils, powders, and washes—an airbrush is helpful, not required [1].
Q3: How do I keep powders from rubbing off?
Use a light flat fixative first to add tooth, then apply powder. If you must lock it in, mist a light matte varnish coat—too heavy will reduce the effect [1][3].
Q4: What’s the difference between _weathering powders_ and _chalk pastels_?
Both behave similarly when used as powder. chalk pastels can be scraped into custom colors, while weathering powders are often pre-mixed for model-friendly tones [3].
Q5: How much rust is realistic?
Less than most beginners think. A couple of well-placed rust streaks matched to prototype photos will look more real than assumptions and heavy coverage [1].
Q6: Should I weather trucks and underbodies too?
Yes—dirty trucks and underbodies sell the whole car. Even subtle grime on the lower areas makes a bigger difference than extreme roof effects [2][3].
Q7: Do techniques change between _HO scale freight cars_ and _N scale freight cars_?
Yes. Smaller scale benefits from lighter contrast and fewer heavy textures. Wash + powder approaches are especially effective on N scale freight cars [2].
- References:
- Beginners Guide Part 10: Weathering — National Model Railroad Association (NMRA). https://www.nmra.com/beginners-guide-part-10-weathering
- Weathering tips and techniques (PDF) — Trains.com / Model Railroader (Kalmbach-style compilation). https://www.trains.com/wp-content/uploads/2020/10/MRRweathering.pdf
- How to weather with powdered pastels — Trains.com / Model Railroader. https://www.trains.com/mrr/how-to/how-to-weather-with-powdered-pastels/
- Using Vallejo Washes (PDF) — Acrylicos Vallejo (official tutorial). https://www.acrylicosvallejo.com/wp-content/uploads/2021/09/vallejo-stepbystep-using-vallejo-washes-EN.pdf
- Basic Painting & Weathering for Model Railroaders — Kalmbach Publishing Company (Book), ISBN 978-0890249550. (Listing includes publisher + ISBN.) https://www.indigo.ca/en-ca/basic-painting-weathering-for-model-railroaders/9780890249550.html
- Quick Weathering Using PanPastels — Model Railroad Academy (Kalmbach/Firecrown training site). https://www.modelrailroadacademy.com/video/quick-weathering-using-panpastels-048132

